Mastering the Art of Filling Out a Check Template: A Comprehensive Guide
In today's digital era, it's easy to overlook the importance of writing a check. However, knowing how to fill out a check template is a valuable skill that can benefit you in various aspects of life, from personal finance management to business transactions. In this article, we'll walk you through the step-by-step process of filling out a check template, covering essential details and providing practical tips for maximum clarity.Step 1: Review the Check Template
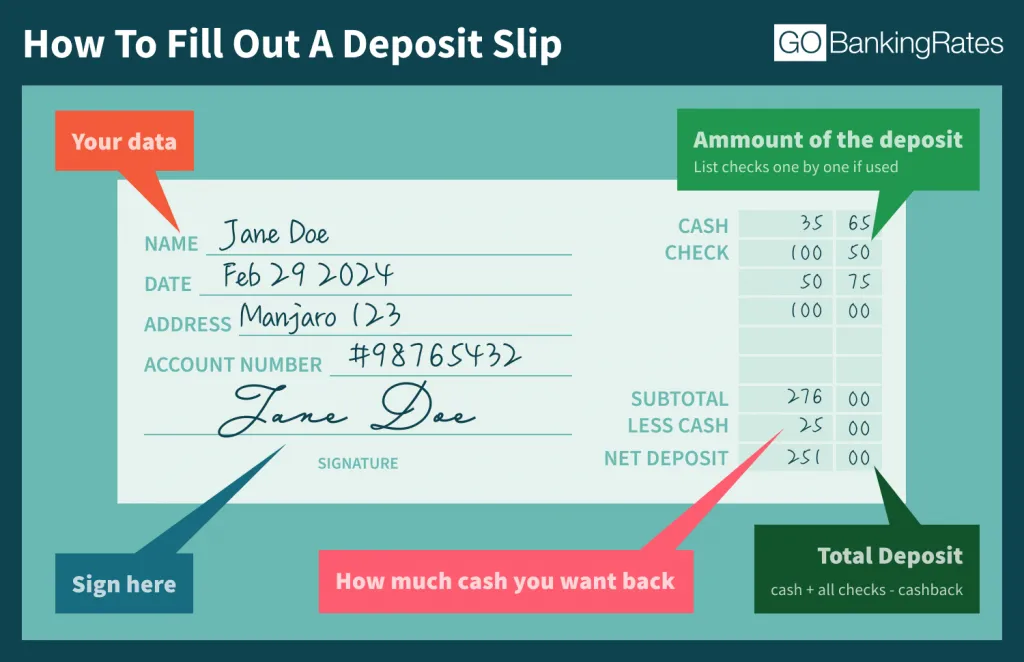
Before you start filling out the check, ensure you have a clear and legible template in hand. Carefully examine each section and understand the related instructions. For a standard check template, you'll typically find the following parts: * Date * Payee (or receiver's name) * Dollar signs Dollars boxed * Numerals written * Memo * Signature areaStep 2: Date the Check
As we can see from the illustration, How To Fill Out A Check Template has many fascinating aspects to explore.
Find the top right-hand corner of the check, where the "DATE" line is printed. Write the current date in a consistent format, usually MM/DD/YYYY (month/day/year).
Step 3: Write the Payee's Name
As we can see from the illustration, How To Fill Out A Check Template has many fascinating aspects to explore.
Find the "PAY TO THE ORDER OF" line, usually at the top left-hand side of the check. Write the name of the beneficiary or recipient.
Ensure to spell the payee's name correctly and clearly, with any relevant titles or designations (e.g., "Mr./Ms./Mrs./Dr.").
Find the box designated for writing the check amount. Insert the dollar sign ($), followed by the number of whole dollars.
Use the numerals box to enter the cents value (up to two digits). If you don't have cents, simply put a line through the box.


 - wikiHow")
")


 - Excel TMP")
 - Word, PDF")


